Free Oracle VPS
Introduction
Oracle Cloud offers a Compute Instance with 4 OCPUs, 24GB RAM, and 200GB storage within their "Always Free" resources. This guide will show you how to set that up.
Find the details and confirm the current offerings on the Oracle Cloud Free Tier page and the Resources page.
A VPS can be used for a variety of purposes, such as hosting a website, running a game server, or even as a remote desktop. You can even use it to host all your Stremio addons and a debrid media server.
To use the Oracle Cloud Free Tier, you need a valid credit/debit card. Virtual/Prepaid cards are not accepted.
Although it is impossible to get charged while on the Free tier, please keep in mind that if you upgrade to a Pay-As-You-Go (PAYG) account, you will be charged for any resources you use that are not covered by the Free Tier. Therefore, it is imperative to ensure that you set your instance up exactly as described in this guide, and that you do not use any resources that are not covered by the Free Tier.
Make sure you do not have any extra instances, volumes etc. created at any given time. The free tier resources cover 200GB of total boot volume space, and exactly 1 A1 Flex instance with 4 OCPUs and 24GB RAM. If you create any additional resources, you will be charged for them.
If you do set everything up correctly, the only thing you can be charged for is bandwidth. Ingress bandwidth is unlimited and free, but egress bandwidth is limited to 10TB per month. If you exceed this limit, you will be charged.
Setup
Creating our VM instance
-
Sign up for an Oracle Cloud account.
-
Go to the Oracle Cloud website and click on "Start for free".
-
Sign up for an account by filling in your details.
tipMany people tend to have issues with the verification process when signing up for Oracle Cloud. If you face any issues, try one of the following:
-
Ensure your billing address matches the address exactly as it appears on your bank statement or banking app.
-
Use an inPrivate window on Microsoft Edge
-
Use a different email address.
-
Use a different card.
-
Disable any adblockers/VPNs.
If you still face issues, you can try using a contacting Oracle support through the live chat widget in the bottom right corner of the Oracle Cloud website.
-
-
-
Once you have signed up, you will be taken to the Oracle Cloud dashboard. Click on
Create a VM instanceunder theBuildsection.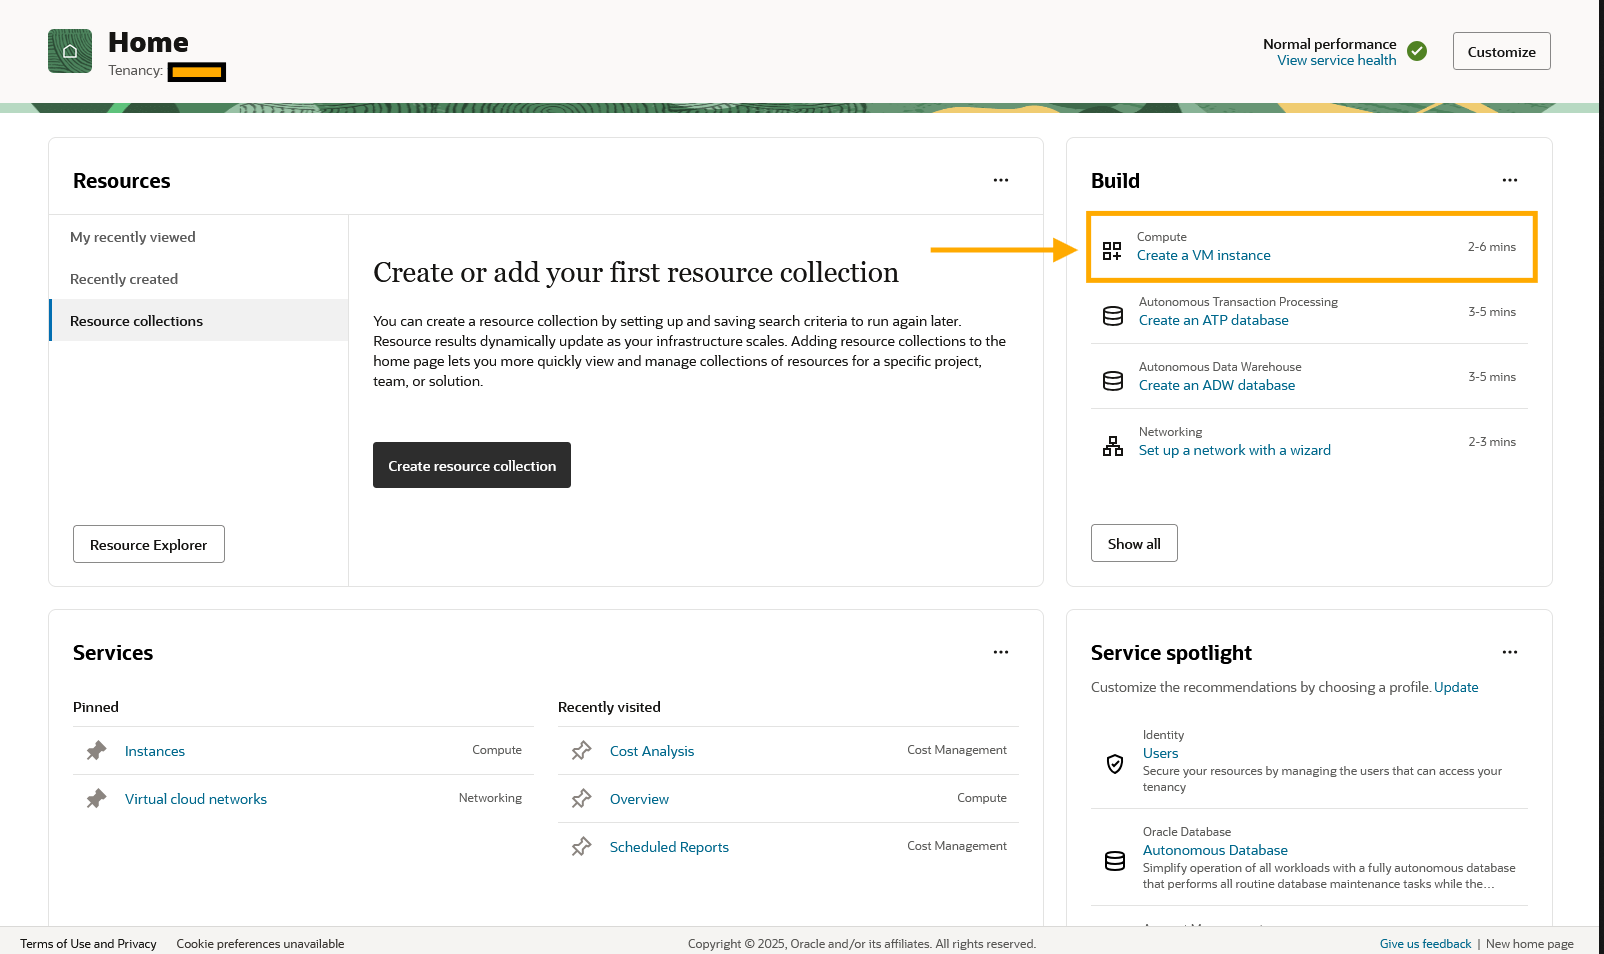
Basic Information
-
Give your instance a name, and the compartment option can be left as is.
-
Configure the image and shape
-
Scroll down to
Image and shape, and click onChange Image. Select the 'Ubuntu' image and 'Canonical Ubuntu 24.04' image name.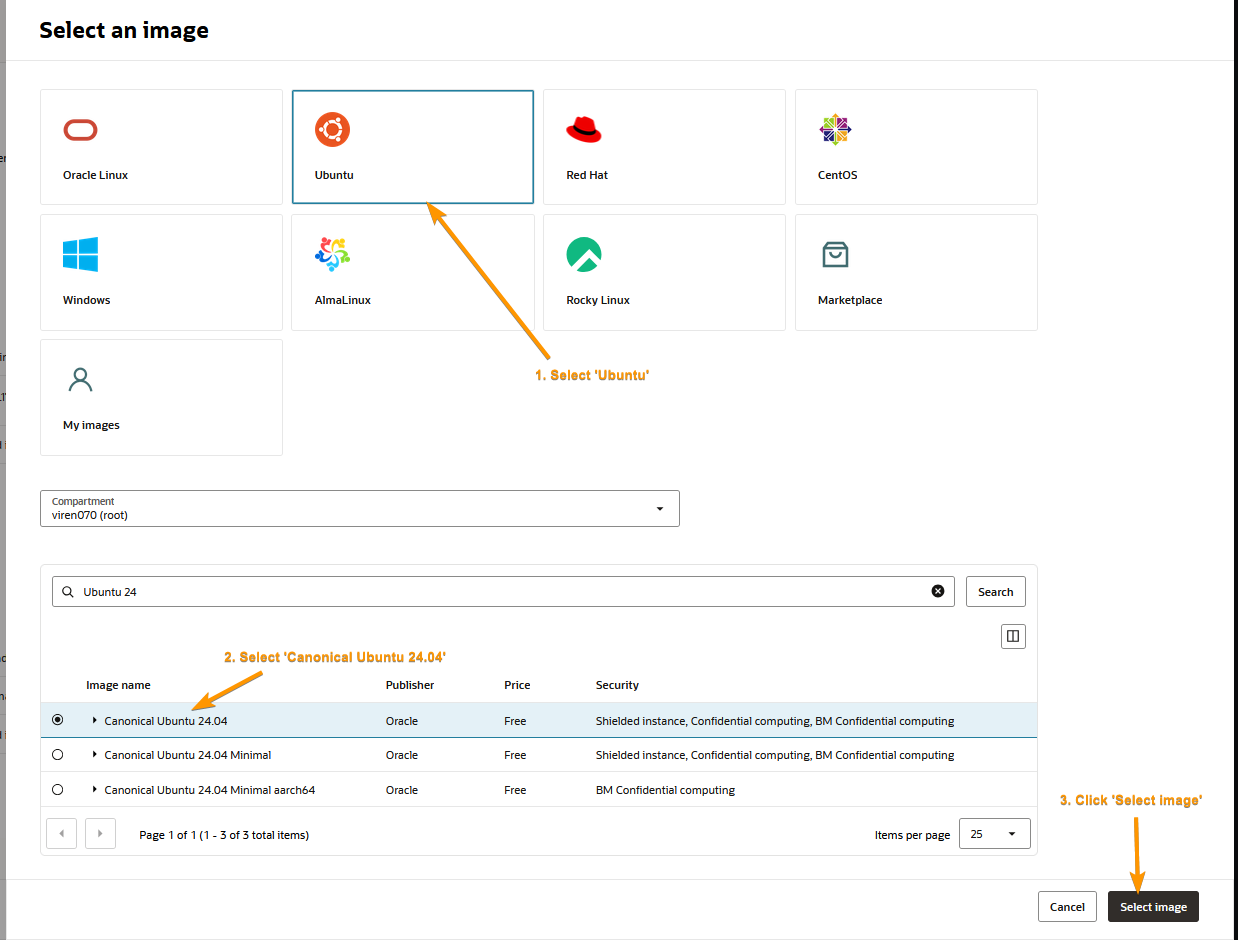
-
Just below the image, you will see the
Shapesection. Click onChange Shapeand select theAmpereseriesVM.Standard.A1.Flexshape. Set the OCPUs to 4, and the memory to 24GB.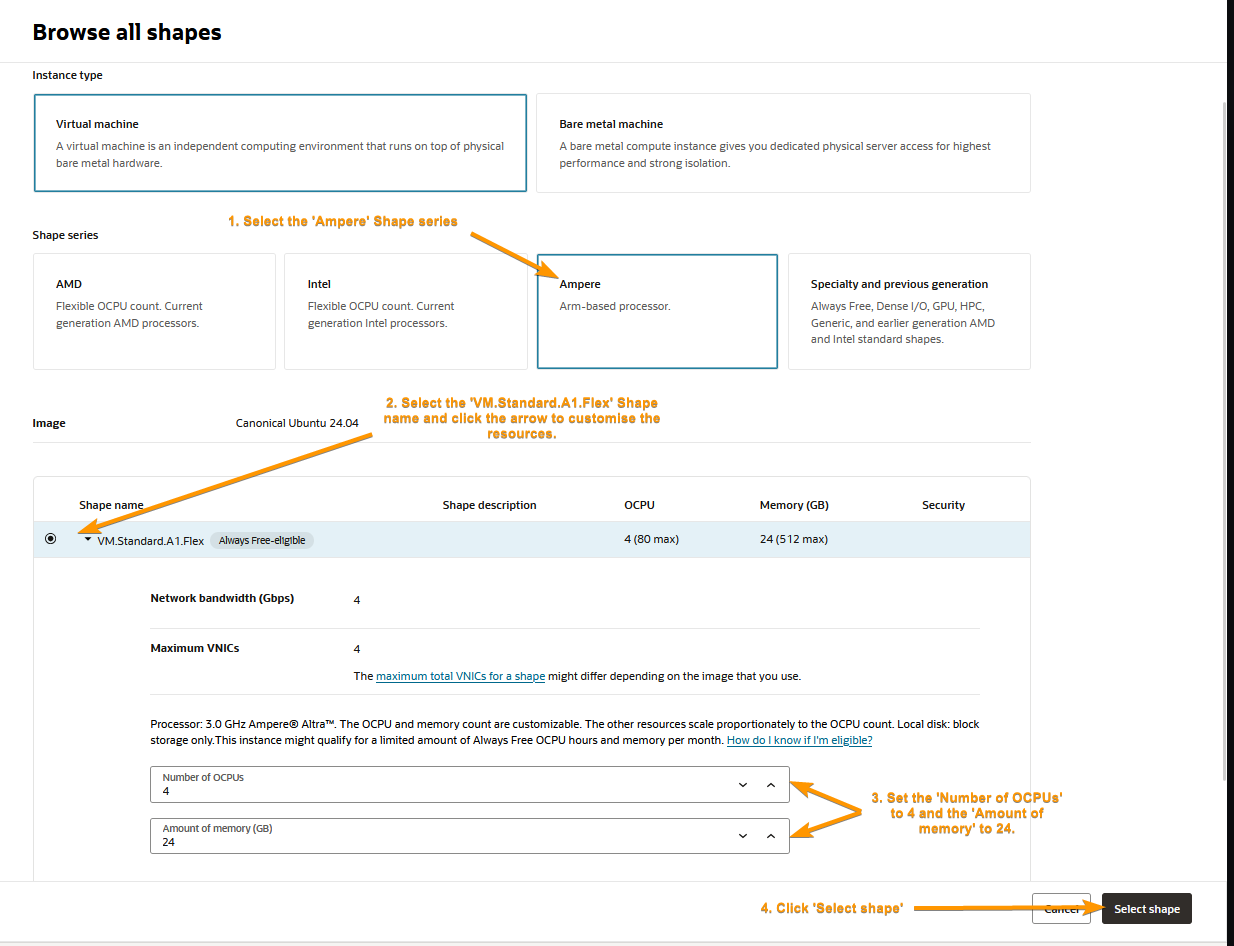
-
To proceed to the next step, click the 'Next' button at the bottom right corner of the page.
-
Security
This section requires no adjustments, so we can skip it by clicking the 'Next' button at the bottom right corner of the page.
Networking
-
Configure your VNIC
- Give your VNIC a name.
- Under
Primary Network, selectCreate new virtual cloud network. - Under
Subnet, selectCreate new public subnet.
-
Generate an SSH key pair. If you already have an SSH key pair, you can skip this step.
-
Open a terminal on your local machine.
-
Run the following command to generate an SSH key pair, replacing
[email protected]with your email address.ssh-keygen -t ed25519 -C "[email protected]"- When prompted for which file to save the key in, press
Enterto save it in the default location. If you already have an SSH key pair, you can save it in a different location. But make sure to remember where you saved it. - When prompted to enter a passphrase, you should enter one. You can generate a passphrase using a password manager like Bitwarden or Proton Pass.
infoOn older systems, where the ed25519 algorithm is not supported, you can use the rsa algorithm:
ssh-keygen -t rsa -b 4096 -C "[email protected]" - When prompted for which file to save the key in, press
-
We will now need to add our SSH key to our SSH agent. Before we do that, we need to start the SSH agent. Open a new Administrator PowerShell window and run the following commands:
Get-Service -Name ssh-agent | Set-Service -StartupType Automatic
Start-Service ssh-agent -
Run the following command in your non-administrator terminal to add your SSH key to the SSH agent:
ssh-add C:/Users/your_username/.ssh/id_ed25519- If you saved your SSH key in a different location, replace
C:/Users/your_username/.ssh/id_ed25519with the path to your SSH key.
- If you saved your SSH key in a different location, replace
-
You will now have two files in your
~/.sshdirectory:id_ed25519andid_ed25519.pub. The.pubfile is your public key, which you will need for the next step.
-
-
In the
Add SSH keyssection, click theUpload public key files (.pub)button and upload the.pubfile you generated in the previous step. Then, clickNextagain to proceed to the next step.
Storage
-
Configure our boot volume.
- Click the switch on the
Specify a custom boot volume size and performanceoption to enable it. - Set the
Boot volume sizeto 200. - Set the
Boot volume performance to120`. - Click on
Nextto proceed to the next step.
- Click the switch on the
Review
-
Review your configuration thoroughly. The key points to check are
-
The
Imageshould beCanonical Ubuntu 24.04. -
The
Shapeshould beVM.Standard.A1.Flexwith 4 OCPUs and 24GB of memory. -
The
Boot volume sizeshould be a maximum 200GB. -
The
SSH keyssection should contain your public key.noteIf you click
View estimated cost, you may see that the cost is not estimated to be free. This is because the cost estimator does not take into account the 200GB Free Tier discount. You can confirm this at Oracle's Cost Estimator page.
-
-
Finally, click on
Createto create your VM instance.
You may encounter an Out of capacity error when creating your VM instance. This is because the free tier has a limited number of instances available:
![]()
You can try again later, or you can try creating the instance in a different Availability Domain by scrolling back up to the top to the Placement section.
You can also switch to a PAYG account, which will allow you to create instances without any restrictions. As long as you stay within the free tier limits, you won't be charged.
Setting up a $1 budget alert to ensure you get notified if you go over the free tier limits is recommended. You will see a $100 charge on your card when you upgrade to a PAYG account. This is a temporary hold and will be released either immediately or within a few days.
This is to ensure that you have a valid payment method on file. You will not be charged for anything unless you go over the free tier limits. It can take up to 24 hours for the upgrade to take effect. You will receive an email once the upgrade is complete.How to upgrade to a PAYG account
Billing and Cost Management.Billing section, click on Upgrade and Manage PaymentUpgrade to Pay-As-You-Go and follow the instructions.How to set up a $1 budget alert
Billing and Cost Management.Cost Management section, click on Budgets.Create Budget.
dont_charge_me11Forecast SpendPercentage of Budget1%Your current usage exceeds Always Free resources. Please check your usage to avoid charges.
Create.How to check if my current usage is forecast to exceed the free tier limits
Billing and Cost Management.Cost Management section, click on Cost Analysis.Show Forecast box.End Date to a future date, such as after a few months.Apply.
- Your instance will now begin provisioning. This can take a few minutes. You will be taken to the 'Work requests' tab where you will see the status of your instance creation.
Once it is complete, you will see the
Stateof theCreate instanceoperation change toSucceeded. You can then click on theDetailstab to view the details of your instance.
Connecting to our VPS
-
Following the previous step, you should be on the
Detailspage of your instance. Copy the public IP address of your instance.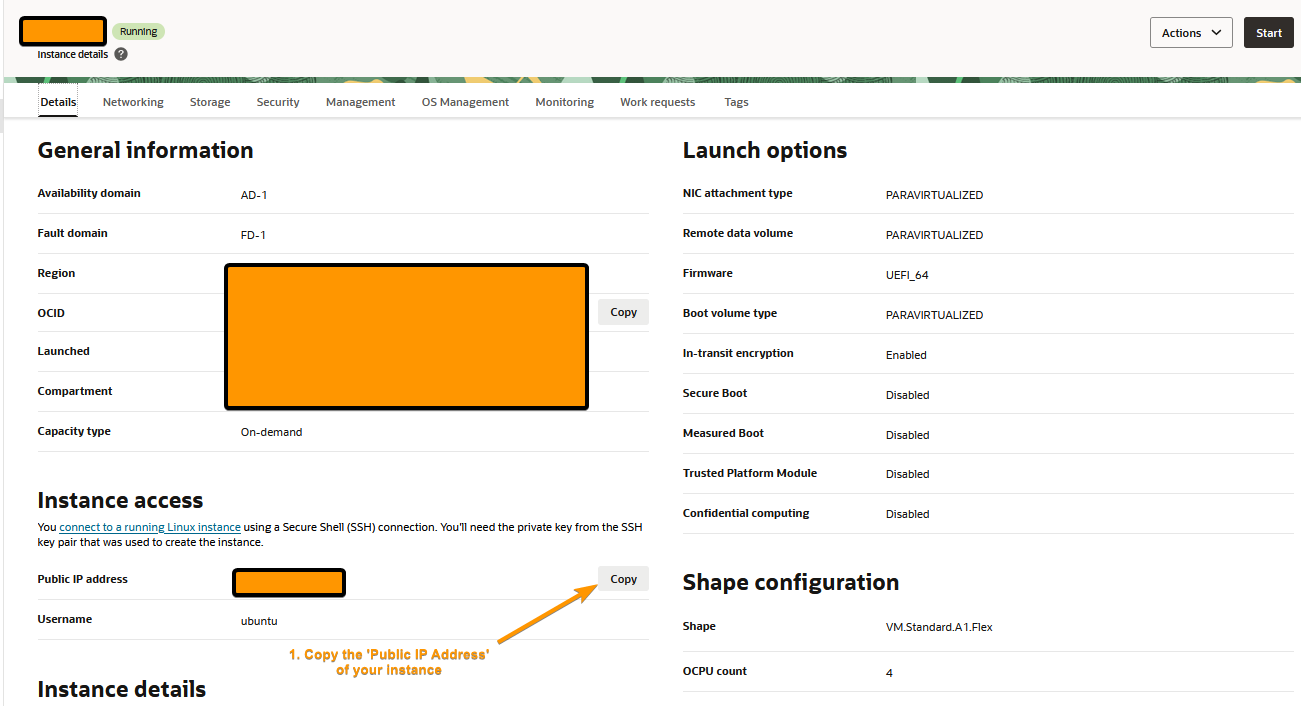
-
Open a terminal on your local machine and run the following command, replacing
your_ipwith the public IP address of your instance.ssh ubuntu@your_ip-
If you are prompted to add the host to your list of known hosts, type
yesand pressEnter. -
If you set a passphrase for your SSH key, you will be prompted to enter it. (You will not see any characters as you type, but it is being entered.)
tipTo avoid having to type the IP address every time you want to connect to your instance, you can create a Windows Terminal Profile.
How to create a Windows Terminal Profile
To do this:
- Open Windows Terminal and click on the down arrow next to the tabs. Then, click on
Settings. - In the
Settingswindow, Scroll all the way down to the bottom and click onAdd new profile. - Click '+ New empty profile' and fill in the following details:
Name:Oracle VPSCommand line:ssh ubuntu@your_ipIcon: You can choose an icon if you want, or leave it as is.
- Click on
Saveto save the profile. - Now, when you click on the arrow icon, you'll see the
Oracle VPSprofile in the list. You can click on it to connect to your instance without having to type the IP address every time.
- Open Windows Terminal and click on the down arrow next to the tabs. Then, click on
-
-
You are now connected to your VM instance. You can now install any software you need, set up a web server, or do anything else you need to do.
Additional Information
Opening ports
By default, all ports are closed on your Oracle VPS. You will need to open the ports you want to use.
- Go to the dashboard of your instance.
- Click on the
Networkingtab. - Click on the link next to
Subnet(e.g.subnet-20250708-1425) - Go to the
Securitytab. - Click on the
Default Security List for vcn-.... - Go to the
Security rulestab and click onAdd Ingress Rules. - Fill in the following details:
Source Type:CIDRSource CIDR:0.0.0.0/0IP Protocol:TCPSource Port Range:AllDestination Port Range: The port you want to open, such as443for HTTPS.Description: A description of the rule, such asAllow HTTPS traffic.
- Click on
Add Ingress Rules, orAnother Ingress Ruleif you want to add more rules.
Using SCP to transfer files
If you need to transfer files to and from your Oracle VPS, you can use SCP.
-
Open a terminal on your local machine.
-
Run the following command to transfer a file from your local machine to your Oracle VPS, replacing
your_ipwith the public IP address of your instance andfile.txtwith the file you want to transfer.scp file.txt ubuntu@your_ip:/path/to/destination -
Run the following command to transfer a file from your Oracle VPS to your local machine, replacing
your_ipwith the public IP address of your instance and/path/to/file.txtwith the path to the file you want to transfer.scp ubuntu@your_ip:/path/to/file.txt /path/to/destination
Your user folder - the folder you are in when you first connect to your Oracle VPS - is located at /home/ubuntu. You can use the ~ symbol to represent your user folder, so /home/ubuntu is the same as ~.
e.g., scp file.txt ubuntu@your_ip:~/file.txt will transfer file.txt to your user folder on your Oracle VPS.